Category Archives: Recipes

Recipe: Peanut Butter Raisin Protein Slice

Want a powered-up protein snack that’s actually delicious and full of #cleaneating goodness? I took these High-Protein Oatmeal Cookies and hacked them to macro-meeting perfection.

They’re most definitely not paleo but they did the job for me when I was getting a little tired of eating so much animal protein on a macro-focused food challenge.

Peanut Butter Raisin Protein Slice | Clean eating snack | lizniland.com

Peanut Butter Raisin Protein Slice

Serves 20 | Macros per serve: Calories 159, Protein 14g, Carbs 15g, Fat 5g  


2 cups of puffed buckwheat
2 cups of oats
4 teaspoons of Natvia
8 scoops of protein (I used AboutTime Cinnamon Swirl Whey Protein Isolate)
1/2 cup almond meal
1/2 cup of unsweetened coconut flakes
1 cup of raisins
2 tablespoons of cinnamon
1/2 cup unsweetened apple puree
1/2 cup egg whites (I use Puregg Simply Egg Whites)
1/2 cup of plain fat free yogurt (I used 0% Chobani)
1/2 tablespoon of olive oil
5 tablespoons of peanut butter (I used Mayvers Organic Crunchy – get one with nothing more than peanuts and maybe a little salt)


Preheat the oven to 180 degrees celsius.

Blitz the first 6 ingredients (the dry ingredients) in a food processor or blender to combine.

Add the last 7 ingredients (the wet ingredients + raisins & cinnamon) and stir to combine into a batter. Add a few drops of water if it’s a little dry (and if you use a pea protein, it might be).

Pour the batter into a lined 8 x 8 pan and pop in the oven for around 20 minutes, or until the slice is lightly browned on top. It should still be a bit fudgey.

Let it cool before slicing into 20 squares & store in the fridge.

Recipe: Dairy-free buckwheat, chia & maca porridge

Buckwheat, chia & maca porridge | Gluten free, dairy free & vegan winter breakfast recipe | lizniland.com

I’ve always been all about the eggs for breakfast. Even as a kid, no sleepy Saturday morning was complete without dippy yolks and buttered toast soldiers. And although I wouldn’t say times have changed, the wintery cold mornings of late have definitely had me thinking about warming bowls of creamy porridge.

Enter buckwheat. Is it paleo? Nope, not if you’re all hardcore about your anti-grain movement (it’s referred to as a ‘pseudograin’). But, if you follow a more paleo-inspired approach, I’m with Chris Kresser: if it works for you, soak it & psuedo on.

Even though it’s gluten-free, buckwheat is still a starchy guy so it’s a good option on days where you need a bit more energy – I usually only have this breakfast on training mornings. It’s not necessarily a great option if you’re trying to trim some kilos (same goes for spuds, rice and any other carbolicious eats) but hell, it has got to beat a croissant, right?

To keep it kind to your insides, minimise the anti-nutrients by soaking your buckwheat groats overnight in a bowl of water. I sort this out the night before and leave it covered with plastic wrap on the bench. So yeah, you need to plan this one the night before. C’mon now though, your future self will be thanking you so hard for laying the groundwork for such warm creamy goodness.

Recipe: Buckwheat, chia & maca porridge

Serves 2 hungry humans | Start it the night before

  • 1/2 cup of buckwheat groats, soaked overnight (go for natural groats, not the toasted ones)
  • 1 cup of almond, coconut or other milk of choice
  • 1 grated nashi pear (or just use an apple when the nashi is out of season)
  • 1 tablespoon of chia seeds
  • 1-2 teaspoons of maca powder (yeah, it’s a ‘superfood’ but it’s quite delish!)
  • Hearty sprinkle of ground cinnamon
  • 4 sliced dried figs (or a small handful of raisins or similar)
  • For garnish & added deliciousness: a little pile of blueberries, fresh or frozen-thawed

Drain & rinse the soaked buckwheat and combine it, along with everything except your garnish into a saucepan on low-medium heat.

Stir regularly as it all warms together and thickens for around 5-10 minutes. If you need any extra liquid to get it to your desired consistency, slowly add either some more milk or water.

Turn off the heat, stick the lid on & let your porridge settle into that creamy puddle of awesome you’re craving. Meanwhile, get your blueberries & serving bowls ready and make sure your breakfast buddy is out of bed.

Dish it out & get stuck in, without burning your tongue.


If you give this recipe a try, hit it with a filter & tag me in it on Instagram. I’d love to know how you go!

Pork Ewe Deli + Endive, fig & root veg salad

An epically delicious wagyu bresaola at our favourite Spanish restaurant, Barrio 2304 (post to come!), led us to check out the new-to-town charcuterie, Pork Ewe Deli on Saturday morning.

Pork Ewe Deli Mayfield

Situated on Maitland Road, Mayfield, this deli brings the best flavours from around Australia and Europe to Newcastle in the shape of amazing cheeses, cured meats, terrines, pate and pretty much any other deli-cacy (see what I did there!) you can imagine.

The cabinet at Pork Ewe Deli Mayfield

We snaffled up a slim wedge of Beaufort cheese (a French raw cow’s milk cheese) and a pile of freshly sliced capocollo (dry-cured pork neck) but wow, everything in the cabinet looked absolutely delicious.

Beaufort and Capocollo at Pork Ewe Deli Mayfield

While we certainly would’ve been happy to kick back and chow down on our purchases straight up for lunch, in a bid to get some more nutrients into the mix, I put together a hearty salad to accompany our unpasteurised French cheese & mouth-wateringly awesome-sauce deli meat.

Recipe: Endive, fig & root veg salad

  • Root vegies of your choice (parsnip would be great, potatoes, turnip, swede & onions will also work a treat)
  • A bunch or two of baby endive
  • ~10 fresh mint leaves
  • Handful of dried figs (sliced & soaked in a little bowl of water for 20 minutes)
  • Dressing: 1 teaspoon of pomegranate molasses + juice of half a lemon + olive oil + salt & pepper

Roast a pile of whatever root veg you have floating around – I opted for chunks of sweet potato & swede with a sliced red onion for good luck. I find that you can never roast too much veg – I always try and roast double what I think we’ll need and it never seems to go to waste.

Endive fig and root veg salad

Sprinkle your favourite selection of seasonings on top  – I went with olive oil, sesame seeds, ground cumin, hazelnut meal, some dried thyme & dried chilli flakes – before throwing it all in a hot oven to soften up & crisp nicely around the edges.

dried figs

While the oven is doing its thing, slice your dried figs and get them soaking. When they’re in season, fresh figs would be ideal here.

For a dressing, I kept it simple with pomegranate molasses, lemon, a crackle of fresh salt & pepper and a good glug of olive oil. Whisk it until combined, or better yet, put your ingredients in a little jar & shake it like a polaroid picture.

Salad raw cheese and capocollo

Once the veg is done, toss everything together in a bowl & serve it up.

While I’m sure the French would be shaking fists that such a delicious cheese be served without a baguette, I can report that making a little taco out of your capocollo and filling it with tangy endive is a sure-fire way to keep your tastebuds onside.

If you’re a Newcastle native, or even in town for a visit, be sure to support this new local superstar. Pork Ewe Deli is definitely a new favourite of ours!

My 10 basic building blocks of paleo eating

I love experimenting with new recipes & finding new ways to whip up delicious feasts. That said though, there are a few basic meals that I always come back to, most of which revolve around the building blocks in this list.

Combine them with each other, with other recipes you find or use these as the basis to create your own adventure. Nail this list of recipes, and the cooking world’s your oyster (or other shellfish of choice).

10 paleo building blocks


1. Cauliflower rice

You need a food processor or blender to make this one worth your while but it’s worth the purchase to have this alone in your arsenal. All you need to do is break a raw cauli into florets, whizz til ricey-looking & then toss into a hot frypan with your choice of flavours & cover for a few minutes until slightly softened. Picture B is a cauliflower fried rice I made with sliced chicken thighs, sliced omelette & assorted fridge-cleanout vegetables. Try it plain with salt & pepper & a squeeze of lemon to accompany fish, or experiment with sliced almonds & turmeric to replace a Moroccan-inspired couscous.

2. Zucchini noodles

Use either a standard veggie peeler or a julienne peeler (this is what I use) shred zucchinis into noodles. Let them dry out for 10-20 minutes or so & then throw them in a hot pan with some coconut oil & a sprinkle of powdered garlic (Picture C). Once you’ve got that down, indulge in these Comfort Noodles.

3. Garbage stir-fry

We covered this one in the breakfast round up but it’s a format you can whip out any old time. Clean out the fridge, slice everything evenly, stir fry in some coconut oil & call it a meal. Make sure there’s a serve of protein involved & if you’re throwing in any leftovers, make sure this is their final outing – only reheat food once.

4. Chicken thighs

While I don’t mind a tin of (sustainably caught) tuna on my lunchtime salads, I do love a good chicken thigh (Picture D). I cook up a batch in the oven on the weekend with S&P, a sprinkle of paprika & garlic and a drizzle of oil. Let them roast for 20 minutes or so at 220°C, until they’re crispy around the edges & cooked through.

5. Boiled eggs

I keep a stash of boiled eggs in the fridge at all times. Throw them in salads, have them as an emergency breakfast or scoff them with raw veggie sticks for afternoon tea. For a refresher in making perfect ones, check out this article.
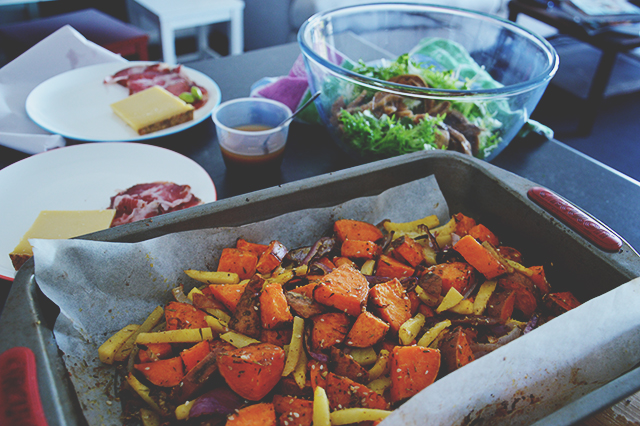
6. Roasted veg

Cold salads are fine in the summer but they aren’t as appealing come blustery winter days. When you’ve got a tray of chicken thighs in the oven, prep a tray of veg to go in as well – brussels sprouts, fennel, zucchini, eggplant & tomatoes, not to mention starchier options like pumpkin & sweet potato, all get their delicious on in this scenario.

7. Mayonnaise

Queen of the condiments in my opinion, the humble mayonnaise can have some offensive ingredients when bought off the long-life supermarket shelf. An egg, some olive oil, a squeeze of lemon & your choice of seasonings are all you need to whip your own in less than a minute. Legit.

8. Meatballs

Whether you make balls, bangers or burgers, mince-y concoctions are cheap, tasty & portable. Like boiled eggs, they’re totally versatile & easy to batch cook. Melissa Joulwan has an epic collection in her book Well Fed 2 & on her website.

9. A slow-cooked bulk meat fest

Another one for the winter days, cooking up a big pot of melt-in-your-mouth meat is a beautiful way to get your house smelling amazing & your co-workers jealous of your leftover lunches for days. Pulled pork is always a favourite and don’t forget about cheaper cuts – they’re perfect for the slowcooker.
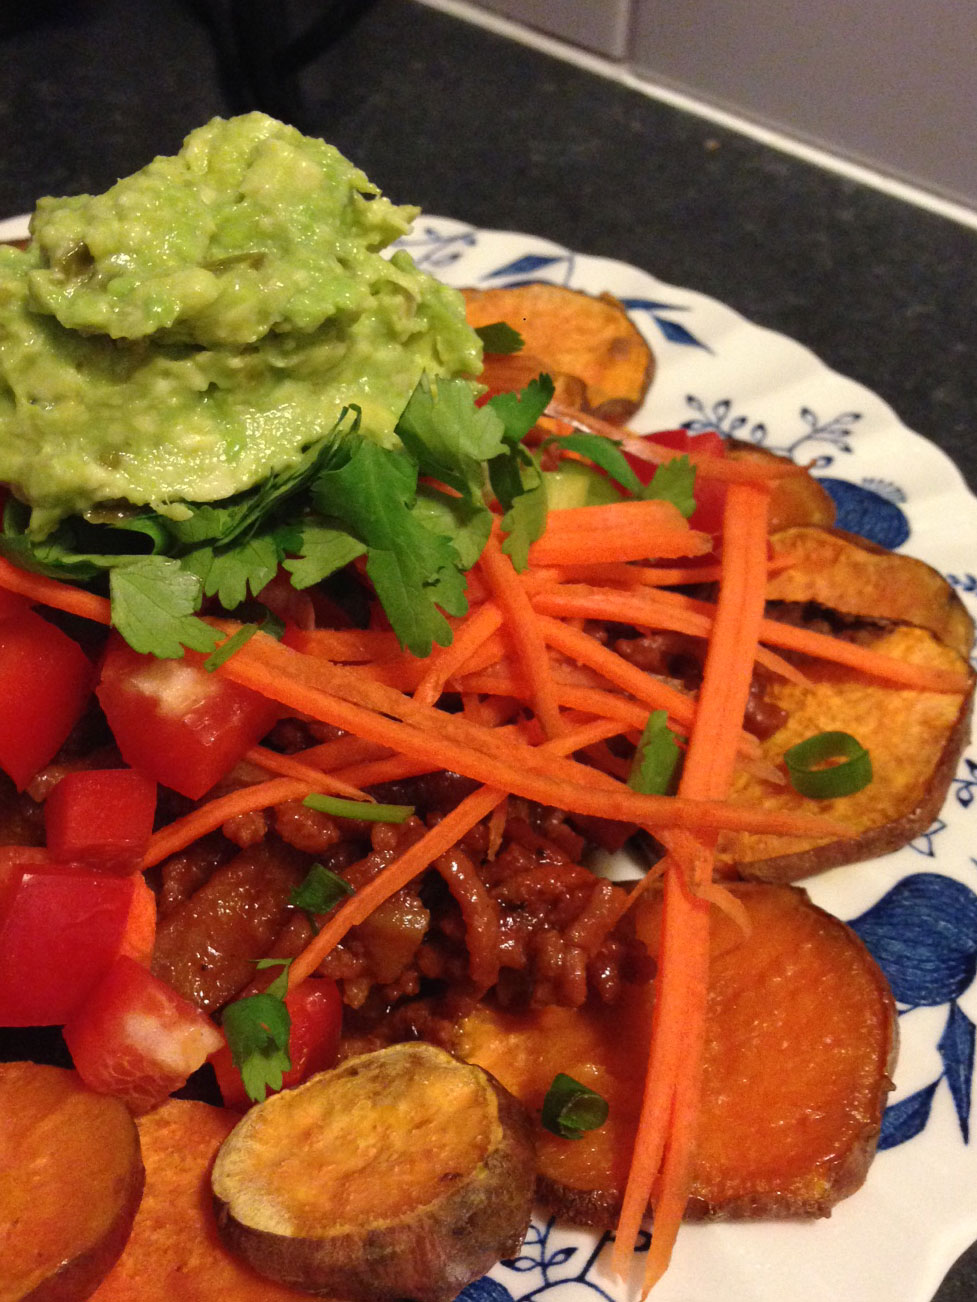
10. Guacamole

Like mayonnaise, guacamole is a top condiment to dollop on salads to up your healthy fat quota & shines as a dip with veggie sticks.

Recipe: Best ever guacamole

For my mate Lee’s engagement party, she requested I bring a big batch of my Best Ever Guacamole. Plonked next to platters of vegetable sticks and corn chips, two trays of this stuff were pretty well demolished before I’d collected a glass of wine to sample some with.

What have we learned? Always make too much guacamole!

Don’t think you have to make this for a function either – I often make a batch on a Sunday & we use it through the week in salads or as a mini Mexi-fiesta with carrot & capsicum sticks. It’s also good dolloped on your morning veg & egg scramble or as a topping for whatever protein you’ve got on the dinner menu.

Guac on a speedy lunch of greens, sweet potato & eggs

Guac on a speedy lunch of greens, sweet potato & eggs

This recipe serves 4-6 guacamole-loving individuals as a party starter. Scale the recipe as required & store in the fridge. It’ll last for a few days – unless you eat it all, which is likely.

Best ever guacamole

  • 2 avocados
  • 1 spring onion/shallot (whatever you call the long green ones. You could sub in red onion here if you’re left shallot-less)
  • 4-6 slices of jarred jalapeños (adjust depending on your heat preferences)
  • 1 lime (or lemon)
  • Salt (Use some good stuff – ain’t nobody got time for that Table Salt business! I use Himalayan pink salt)

Finely slice your shallots & jalapeños and mush the suckers in a mortar & pestle (or with the back of a fork) until they’re a good green mess.

Add the juice of half the lime & grind in more salt than you think you should (about 1/2 – 3/4 of a teaspoon to start off with)

Mix everything together, cover & put it in the fridge for around 30 mins (& up to a few hours) to get the flavours mingling to the max.

When you’re ready to serve, or when the desire for guac overwhelms you, mash in the avocados.

Be sure to taste as you go – you want a good combination of flavours. Don’t be tempted to put in a bucketload of lime though; if it tastes like it’s missing something, you probably just need to add a little more salt. Stir it through & then taste again. You’ve got your other lime half though if you do need a little more zesty action.

Make ahead tip: When I made this for Lee, I mashed up the shallot/jalapeño/lime/salt mix a couple of hours before the party & then added in the avocado just prior to serving, adjusting seasoning accordingly.

A tower of sweet potato nachos crowned by delicious guacamole

A tower of sweet potato nachos crowned by delicious guacamole

Recipe: Grain-free fig & hazelnut granola

grain-free fig hazelnut granola
My favourite of all the breakfast options is always eggs. Boiled, fried, scrambled or poached; I don’t discriminate. My other half though, well, he likes eggs but his heart has always belonged to sweet breakfasts. Pre our own paleolithic era, a creamy bowl of oats topped with fruit & honey or a thick slice of banana bread smothered with ricotta would do him just nicely thank you very much.

Almost every week since we started living life grain & dairy-free, I put together a batch of granola so we’ve always got a speedy breakfast on hand that satisfies any yearnings for the days of old. The beauty of granola is that you can easily customise it to whatever is in the pantry & you’ve got plenty of wriggle room to substitute or supplement for your own cravings or food requirements.

Our Healthful Pantry order this month included organic hazelnuts & dried figs so I was inspired to put this combo together. Hazelnuts, honey & cacao almost had me tasting Nutella. Almost.

This isn’t an everyday food but it’s an indulgence I like to have once or twice a week on days where I haven’t trained before breakfast & won’t be eating another nut-based meal/snack throughout the day.

I store this in a sealed container in the fridge & it usually lasts us 5-6 serves, depending on how much ‘accidentally’ gets stuck to the spoon after stirring (& consequently ends up in my mouth).

Grain-free fig & hazelnut granola

  • 1 cup hazelnuts
  • 1 cup almonds
  • 1 cup coconut flakes
  • 8 dried figs
  • handful or 2 sunflower seeds
  • handful or 2 cacao nibs
  • shake of ground cinnamon
  • 1-2 tblsp raw honey
  • 1-2 tblsp coconut oil

Preheat your oven to 150°C (300°F) & line a large tray with baking paper (you don’t have to but you’ll thank yourself when you’re trying to wash the tray later tonight!)

Blitz the hazelnuts & almonds in a food processor for a few seconds, or until they’re roughly chopped (or chop them by hand if it’s early/late & you’re overly kind to your neighbours) & tip them onto your baking tray.

Thinly slice the figs & toss them, along with the coconut flakes, seeds, nibs & cinnamon, on to the tray mixing them in with the nuts.

Drizzle your coconut oil & honey (warm them if they’re a bit solidified) over the lot & mix it through a little to evenly distribute.

Bake at 150 degrees for 30 minutes stirring every 10 minutes or so, trying not to burn your tongue on the spoon when you inevitably succumb to the toasty aroma.

Once it’s looking all golden and delicious, remove from the oven & let it cool down for a bit before tipping it into a container for storage.

Fig & hazelnut granola - Grain-free & paleo

We love to eat our granola topped with sliced banana, a handful of blueberries & a hearty drizzle of coconut milk. Depending on your relationship with dairy, feel free to involve some full-fat plain yogurt or whatever you’d normally put with crunchy breakfast-y goodness.

Just between you & me though, it’s also quite delicious eaten plain, by the handful, straight from the fridge.

Cauliflower Pizza Base

Cauliflower Pizza Base 1

Oooohh pizzaaa! While my mouth thinks there is nothing better than the cheesey, often meaty, delicious shamble that makes up a pizza, unfortunately my belly strongly disagrees. The ol’ stomach doesn’t seem to munch down wheaty goodness quite like it used to & within an hour or two of eating such carby delights, the digestive complaints start, mostly by way of bloat, loud rumbles & swishy-wishyness.

So when I saw this Cauliflower Pizza Base doing the rounds on Pinterest, I thought it might be a tummy-friendly go-er. The Lad thought it sounded terrible. In his opinion, there was no way that cauliflower could ever replace flour & yeast in a pizza base without tasting a whole lot like, well, cauliflower. I do enjoy the occasional floret of cauliflower when it is dished up to me but, I had similar doubts to The Lad – could mushed cauliflower make a pizza base?

Cauliflower Pizza Base 2

The answer, my friends, is a resounding, man-approved YES! And we’ve made it twice since my first foray (I waited til I was cooking & dining alone for the first effort but, after seeing my fridged leftovers, he happily lapped up a slice)

Cauliflower Pizza Base 3

I followed this recipe pretty much to the letter but I only grated (no food processors here!) & nuked (2.5 mins was plenty) the one required cup of cauliflower per base. Also, since the first run, I’ve tried baking the base  both with a little oil & without. With the oil was a little greasy – like a take away pizza – & without the oil was fine & definitely not too dry. I’d recommend going without – the base stays moist enough & the cheese makes it all go nice & golden anyway.

Cauliflower Pizza Base Raw

The base: pre-bake

For the topping, I used Iowa Girl’s Spicy Sausage & Sundried Tomato Goat Cheese Pizza as my inspiration. I used the world’s best pizza topping – chorizo, naturally – diced as the sausage.

Cauliflower Pizza Base Topping

Meats, cheeses & greens – oh my!

It was deeeelicious. This is definitely worth trying out regardless of whether or not your belly can handle wheat! It’s a great way of sneaking extra vegies into your meals and it’s a helluva lot easier & speedier than waiting for standard from-scratch dough to rise. The whole pizza can go from fridge to plate in half-an-hour: while the base has its initial bake, get cookin’ on your toppings & it’s seriously ready in no time at all.

Cauliflower Pizza Base 5

Sesame Orange Chicken

Chinese food is a funny thing. The food I thought of as “Chinese” when I was growing up included spring rolls, beef in black bean sauce and anything else in the bain marie at the local bowling club’s all-you-can-eat.

Scorpions… Crunchy.

When I was in China though, the food was a whole other level of delicious & there wasn’t a soggy dim sim in sight. Peking duck, garlicky choy and every sauced up animal part you could imagine was on offer. While scorpion, testicles & starfish weren’t the most delicious options, they certainly opened up a new world of what Chinese food really has to offer.

Testicles. Yep, testicles.

The discovery of Shanghai cuisine was another highlight – hello to one of my favourite restaurants, New Shanghai. Once you go Xiao Long Bao, you won’t go back.

So given this excitement for what lies beyond the bain marie, it’s taken me a long time to come back for Westernised Chinese food. It’s actually taken me pretty much until this recipe – Sesame Orange Chicken – to attempt to cook it, let alone eat it.

I never deep fry at home (for a combination of health, taste & excessive oil usage reasons) so I ditched the batter end of this recipe & just opted for a good cornflour dredge instead.

Other than that and the addition of some greens though, our stab at Sesame Orange Chicken went pretty much to the letter.

The first time we made it (with lightly steamed beans for the greens), the sauce gathered up so quickly that what should’ve been sticky orange deliciousness turned into a bit of a glug-fest (albeit a very flavoursome one!)

Round One: Glug fest

With the Lad keen to give it another chance, Sesame Orange Chicken made this week’s menu in the hope we could do the recipe justice. This time, instead of the 2 tablespoons of cornflour in the sauce mix, we opted for 2 teaspoons worth. And we added in extra orange zest this round – if you’re going to be a bear, you may as well be a grizzly! This. Was. A. Winner. (A winner winner chicken dinner, if you will!)

Yummmm

The sauce was a ladle-able puddle of sweet yet tangy syrupy goodness. For greens, we went for some almost-faded broccoli (which chirped up nicely in some icy water) and the whole deal was dished out on a bed of white rice.

Sesame Orange Chicken, adapted from Blogchef.net

Chicken
2 chicken breasts sliced into bite-sized chunks & seasoned with salt & pepper
enough cornflour to fairly decently coat the chicken pieces
peanut oil for shallow pan frying
steamed greens

Sauce
¼ cup tomato sauce
¼ cup honey
2 teaspoons sugar
2 tablespoons white vinegar
½ cup water
2 teaspoons cornflour
1 teaspoon sesame oil
the juice of ½ orange
zest of one orange
sprinkle of garlic powder
sesame seeds

Step 1: Dredge chicken in cornflour & pan fry. Remove from pan when browned & cooked through.
Step 2: In a bowl whisk together sauce ingredients and pour into the wok to cook until thickened and bubbly.
Step 3: Add chicken & steamed greens back to the pan & heat together until everything is coated in syrupy sauce.
Step 4: Load up your bowl and say it with me “Oooooh yeahhh”.

Shallot & Turkey Rissoles with Soy-Ginger Glaze

Feeding three hungry post-gym mouths (Hello BodyAttack – major session tonight!) is no mean feat but this variation on a Smitten Kitchen recipe was A Winner.

Turkey Rissoles

Served up with a mini-mountain of brown rice and an improvised garlic, mint, bean and mushroom dish, Scallion Meatballs with Soy-Ginger Glaze were made man-size & doused in this delish glaze. We pretty much followed the recipe exactly, except for subbing in the rice wine vinegar & sugar combo for the mirin in the glaze recipe – it worked perfectly though. Oh Em Gee the syrupy glaze…

Syrupy glaze

Definitely make these suckers – whether you go rissole style like we did or meatball style like the original, they are absolutely deeelightful.

To make the green bean-centric side dish, I plonked a pile of green beans (topped, tailed & halved), the rest of last night’s sliced swiss browns and a little handful of chopped up fresh mint into a pan with a couple of spoons of peanut oil & around 2 tsp of minced garlic. After everything gets a bit browned around the edges & the deliciousness all mingles together, I poured around half a cup of water into the pan to help steam the beans a bit further into tender submission.

Totally a recipe worth repeating – gotta love it when a throw-together-hope-for-the-best makes even the anti-mushroom housemate get a little excited.

Greeeeens

Ah greens, I love thee. Is it surprising that my car is also green?

Chicken Lettuce Wraps + Smashed Spuds

The Lad is a big fan of San Choy Bao and while I’ve never hated the dish, it’s not one I was keen on re-creating at home. I’m all done for the Asian-y, mince-y, meaty good times but the lettuce always gets a bit warm and limp and just makes me wish it was a pile of capsicum or noodles or something else that would stay snazzy with warm mince.

BUT when I came across Spoon Fork Bacon’s recipe for Chicken Lettuce Wraps I thought I might be on to a winner that would keep both me & him happy. Something about the deliciously thick and saucy chicken breast pieces stirred up with shallots and mushrooms was too good to refuse – even with the presence of lettuce leaves!

Pretty Lettuce Photo
We pretty much made the recipe exactly as it was here except we omitted the chestnuts & bamboo shoots (keepin’ it simple) & used swiss brown mushies (on sale at Woolies – hello!) instead of shiitakes.

Saucy chicken

Thick, sticky & delicious

Being inspired by the thought of a barbecue on stinking hot days such as today (and tonight – it’s gotta be about 30 degrees C still I reckon!) we opted for the pot luck randomness of a little potato side to accompany our chicken lettuce combo.

Delicious Potatoes

Based on a recipe Iowa Girl Eats posted sometime back, these carbolicious lip-smackers are an easy alternative to roasted taters but just as tasty. Boil the suckers up whole & then, when they’re done nicely (still firm but not crunchy), put some slice marks across the top to resemble a noughts & crosses board & then give them a gentle squash down with a masher/spatula/textbook. Lay out on a tray & give a good sprinkle with S&P, garlic powder & decent olive oil. Stick them under the grill and let them get niiiice and crispyyyy around the edges. Delish!

With bellies full of sticky chicken, lettuce leaves & spuds, we’re going to attempt to hit the hay despite the humidity… C’mon cool change!

“It’s so damn hot, milk was a bad choice!” 

Orange-spiked banana bread

While The Lad & I have been co-habitating for sometime now, this week brought with it the moment our stuff had to also co-habitate. Moving all of my furniture, many clothes and many more shoes, jewellery and other assorted accessories into the house The Lad’s shares with a mate, has meant that beloved old commemorative polo shirts, toy model cars and similar boy accoutrements have been boxed up and shifted to the spare room.

Don’t worry, I’ve also downsized to help the squeeze in – three pairs of shoes and a couple of tees, dresses and other bits will be soon hitting the shelves at the local Salvo’s op-shop! In a bid to soften the blow of cushions entering The Lad’s man cave, I not only put his big trophies on display atop the bookshelf, I also made his favourite: this banana bread, subtly spiked with orange zest.

Orange-spiked Banana Bread

I’ve seen some criticism of this recipe on the interwebs due to people’s dislike of the orange factor but it’s the orange flavour that give it so much cred in this house. In tonight’s brew, I went against the recipe & also added a little handful of shredded coconut. I’ll totally do it next time too – big thumbs up.

Zest is best

Orange-spiked Banana Bread
(Recipe slightly adapted from Marie Claire’s Kitchen by Michele Cranston – seriously my bible in the kitchen)

Ingredients

  • 90g softened butter
  • 1/2 cup caster sugar
  • 2 eggs
  • 1 tsp vanilla extract
  • 2 cups of plain flour
  • 2 tsp baking powder
  • 2 large ripe bananas
  • 1/2 cup shredded coconut
  • Grated zest of 1 orange
  • Once zested, slice & reserve the orange

Method

  1. Preheat the oven to 180 degrees Celsius & get a loaf tin ready. I used a silicon loaf pan – my pick for non-stick
  2. Throw all the ingredients except the reserved decorative orange slices in a mixing bowl & combine. I’m old school & prefer a wooden spoon – the original recipe recommends a food processor but whatevs you got, I say!
  3. Once combined, pour into the loaf pan and fan your decorative orange slices across the top. I baked this loaf covered with foil for about half the cooking time to keep the oranges from going too toasty around the edges.
  4. Place in the oven for one hour, or until an inserted skewer/knife/poker-of-some-sort comes out clean.

Chocolate & Raspberry Tartlets

In an attempt to minimise the food in the fridge/freezer/cupboard before moving house this weekend, I made these Chocolate & Raspberry Tartlets… </thinly veiled excuse to eat more chocolate>

Chocolate Raspberry Tartlets

I cheated with the tart cases – they were from a frozen packet wedged in the back of the freezer. The raspberries were also frozen but once those suckers defrost, they don’t taste too different to the real fresh deal (as long as you buy the good frozen ones at least!)

For the “cream” in the mix, I used this new Philadelphia Cream for Desserts. While it freaked The Lad out a little that I planned to put something that looks a lot like a tub of cream cheese into his dessert, a quick swipe through the thick deliciousness convinced him otherwise.

I put the below pic on Facebook via Instagram while I was making these and was met with frustrated excitement from a heavily pregnant mate who’d obviously run out of tasty snacks in her neck of the woods.

Spoon-lickin' good

Chocolate Raspberry Tartlets

Makes 6-8 tarts (depending on how much ganache you end up with & how choc-heaped your tarts end up!)

Ingredients

Method
  1. Blind bake the tarts as per packet instructions (usually in a moderately hot oven for 10 minutes or so) Let cool pretty much completely.
  2. Melt chocolate down slowly – I won’t tell anyone if you use the microwave to do it. Just promise you’ll nuke for 20-30 seconds at a time (no longer!) and stir well between repeats.
  3. Once the chocolate is completely melted down, stir in around 2/3 of the cream. Make sure you work fast as the cream will thicken the chocolate quickly.
  4. Put scoops of the ganache in the tart cases & then lick your delicious chocolatey spoon while decorating the tarts with the remainder of the cream & the raspberries.
  5. Leave the tarts on a tray in the fridge for as long as you can bear. I recommend making them before dinner & refrigerating for at least an hour. We managed to hold out for two hours & they were perfectly set.

Too easy. Too dangerously easy.